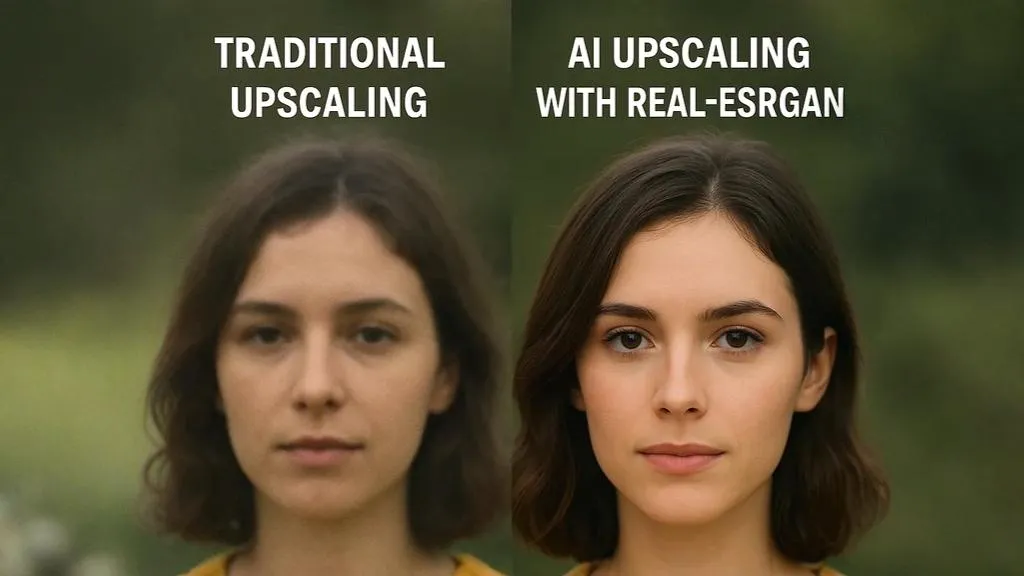
Old family photographs are irreplaceable treasures that connect us to our past. However, time takes its toll on these precious memories – fading colors, accumulating scratches, and deteriorating paper quality can obscure the images that once vividly captured our family history.
Fortunately, advances in AI technology now make it possible to restore these cherished photographs to their former glory and even enhance them beyond their original quality. In this comprehensive guide, we'll walk through the process of using AI upscaling and digital restoration techniques to breathe new life into your old family photos.
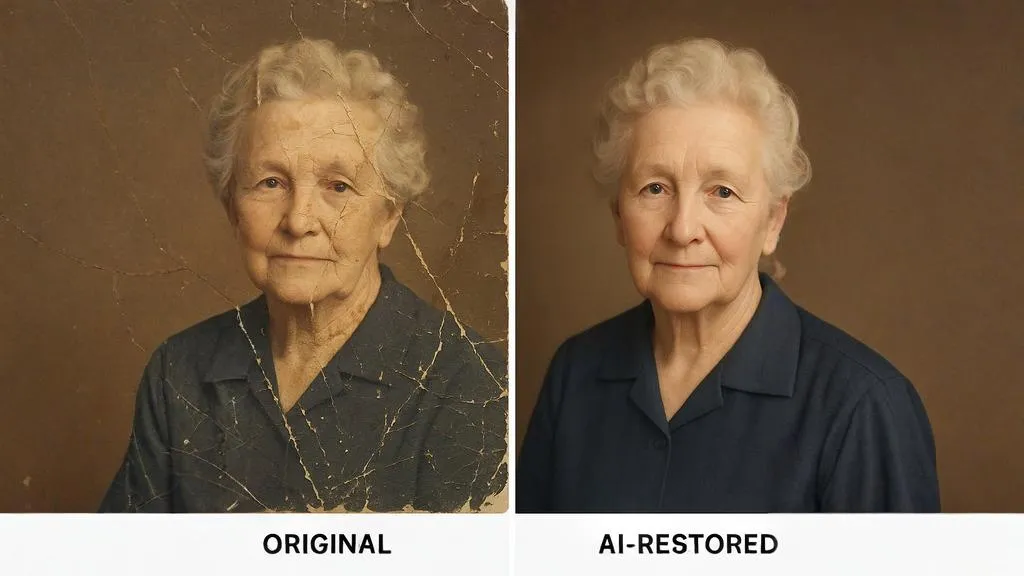
Comparison of an original damaged photograph and its AI-restored version
Why Restore Old Photos?
Before diving into the how-to, let's consider why photo restoration is so valuable:
- Preserving family history: Restored photos help maintain connections to previous generations
- Creating gifts: Restored photographs make meaningful presents for family members
- Digital archiving: Creating high-quality digital versions ensures photos survive even if the originals deteriorate further
- Revealing hidden details: AI enhancement can bring out details that are no longer visible to the naked eye in the original
- Creating prints: Restored photos can be printed in larger formats for display
Understanding Common Issues with Old Photographs
Different eras of photography faced different challenges. Here are the most common issues you might encounter:
Pre-1950s Black and White Photos
- Fading and loss of contrast
- Scratches and tears
- Stains and water damage
- Chemical spotting
- Mold or foxing (reddish-brown spots)
Color Photos (1950s-1980s)
- Color shifting (often toward red or yellow)
- Color fading (particularly cyan)
- Surface scratches
- Light damage
- Physical deterioration of layers
Early Digital Photos (1990s-2000s)
- Extremely low resolution
- Digital compression artifacts
- Poor color balance
- Limited dynamic range
- Digital noise
Preservation Tip: Before starting any restoration process, always scan or photograph the original at the highest quality possible and store this unedited version. This preserves the authentic state of the photo and gives you a backup if anything goes wrong during restoration.
Equipment and Tools You'll Need
For Digitizing Old Photos
- Scanner: Ideally a flatbed scanner with at least 600 DPI capability
- Alternative: A smartphone with a good camera and stable mounting option
- Clean, lint-free cloth: For gently cleaning photos before scanning
- White gloves (optional): To prevent oils from your hands affecting photos
- Neutral background: If photographing rather than scanning
Software and Services
- Image AI Upscale: Our AI-powered upscaling tool for enhancing resolution
- Basic photo editing software: For pre and post-processing (Photoshop, GIMP, etc.)
- Cloud storage: For backing up your restored images
Step 1: Digitizing Your Old Photographs
The first step in the restoration process is to create high-quality digital versions of your physical photographs.
Using a Scanner (Preferred Method)
- Clean the scanner glass thoroughly to remove any dust or smudges
- Gently clean the photograph with a soft, dry cloth to remove loose dust
- Place the photo face-down on the scanner glass
- Scan at a minimum of 600 DPI (1200 DPI is better for very small or detailed photos)
- Save the scan as an uncompressed TIFF or PNG file (avoid JPEG for the master file)
Using a Smartphone Camera
- Find a well-lit area with indirect natural light (avoid direct sunlight)
- Place the photo on a neutral surface (white or black)
- Mount your smartphone on a stable surface or tripod directly above the photo
- Turn off flash and use HDR mode if available
- Ensure the photo is completely flat and the camera is perfectly parallel to it
- Take multiple photos with slight adjustments to focus and exposure
- Select the best image and crop it carefully
"The quality of your final restoration is only as good as your initial digitization. Take time to create the best possible digital copy of your original photograph."
Step 2: Basic Cleaning and Preparation
Before applying AI upscaling, it's important to perform some basic cleanup:
Crop and Straighten
- Crop away any borders, frames, or excess background
- Ensure the image is properly aligned (straighten if necessary)
- If the photo has a decorative border you want to keep, consider processing it separately from the main image
Remove Major Dust and Scratches
- Use the spot healing brush or clone stamp tools in your editing software
- Focus only on major distractions at this stage
- Don't worry about small imperfections yet – AI upscaling may help with those
Basic Contrast Adjustment
- If the image is very faded, apply a gentle contrast enhancement
- Adjust levels to ensure there are proper blacks and whites
- Be careful not to lose detail in shadows or highlights
Important Note: For severely damaged photos, consider breaking the restoration into separate stages: structural repair (tears, missing pieces), spot removal (dust, scratches), tone correction (contrast, exposure), color correction, and finally upscaling. This methodical approach yields better results than trying to fix everything at once.
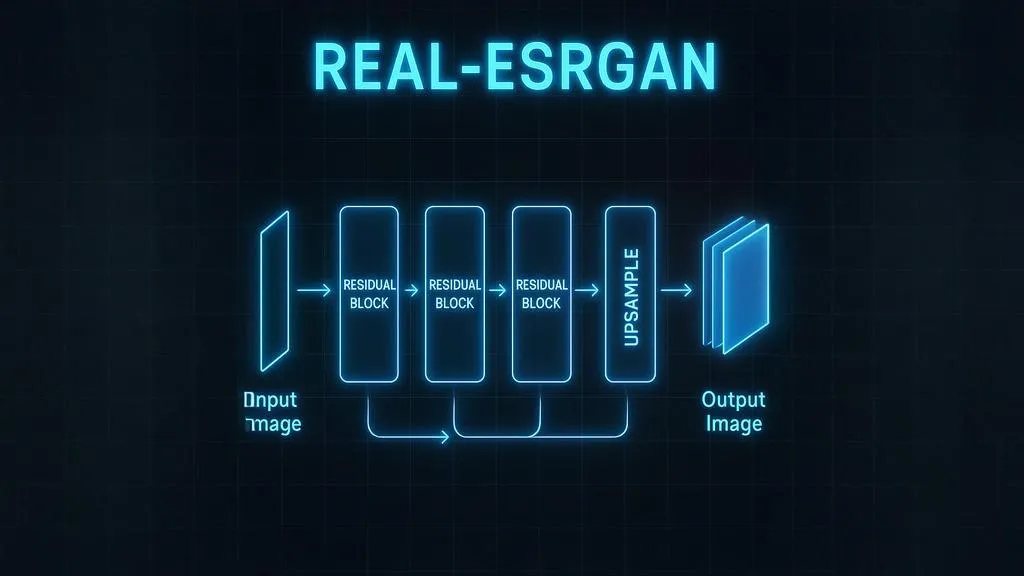
Step 3: AI Upscaling with Image AI Upscale
Now comes the transformative part – using our AI upscaling technology to enhance the resolution and detail in your old photo:
- Navigate to our upscaling tool
- Upload your prepared image
- Choose an upscaling factor:
- 2x for moderately old photos
- 4x for very old or small photographs
- Select the "Photo Restoration" enhancement option if available
- Process the image
- Download the enhanced result
The AI will analyze your image, recognize faces and features, and enhance details while maintaining the authentic character of the original photograph. It's particularly effective at:
- Sharpening facial features
- Enhancing fabric textures
- Improving clarity of background elements
- Reducing noise while preserving detail
- Reconstructing partially damaged areas
Step 4: Post-Processing and Fine-Tuning
After AI upscaling, some additional adjustments can perfect your restoration:
Color Correction
For color photographs that have suffered from color shifting:
- Identify neutral areas that should be gray/white
- Use the white balance tool to correct overall color cast
- Adjust individual color channels if necessary
- Consider selective color adjustments for problem areas
Detail Enhancement
- Apply selective sharpening to important features (eyes, jewelry, etc.)
- Use clarity or structure adjustments cautiously
- Consider local contrast enhancement for flat areas
Final Touch-ups
- Address any remaining spots or blemishes
- Check edges for artifacts from the upscaling process
- Review at various zoom levels to ensure natural-looking results
Step 5: Saving and Archiving Your Restored Photos
Properly saving your work ensures it remains available for future generations:
File Formats and Organization
- Save a master copy as a TIFF or PSD file with layers (if applicable)
- Create JPG versions for sharing
- Implement a logical naming convention (e.g., "Smith_Wedding_1952_Restored_2025")
- Include relevant metadata (names, dates, locations) in the file properties
Backup Strategy
- Follow the 3-2-1 backup rule: 3 copies, 2 different media types, 1 off-site location
- Consider cloud storage services for easy sharing with family members
- Print physical copies of special images on archival-quality paper
Case Study: Restoring a 1930s Family Portrait
To illustrate the process, let's walk through a real-world example:
Robert came to us with a treasured family portrait from 1937. The 5×7 inch print had severe fading, several creases, water damage in one corner, and had been stored in a non-archival album that caused chemical spotting.
- Digitization: The photo was scanned at 1200 DPI using a professional flatbed scanner
- Basic Preparation: Major creases were repaired using the healing brush tool, and the overall contrast was gently improved
- AI Upscaling: Using our 4x upscaling model, the image was enhanced from approximately 2000×1400 pixels to 8000×5600 pixels
- Detail Recovery: The AI processing revealed facial features that had been nearly invisible in the faded original
- Final Adjustments: Selective sharpening was applied to eyes and jewelry, and the water-damaged corner was reconstructed
- Result: Robert received a digital file suitable for printing up to 26×20 inches and had several 8×10 copies printed on archival paper for family members
Robert's response: "I can now see details in my grandmother's face that I never knew existed. This restored photo has become a centerpiece at our family gatherings."
Historical Authenticity Note: When restoring historical photographs, it's important to balance enhancement with historical accuracy. Avoid the temptation to "modernize" old photos by adding colors that wouldn't have existed at the time or applying effects that change the fundamental character of the original.
Common Challenges and Solutions
Challenge: Severely Faded Images
Solution: Use curves and levels adjustments to expand the tonal range before upscaling. Our AI model can often recover details that appear completely lost to the human eye.
Challenge: Creased or Folded Photos
Solution: Carefully scan in sections if needed, then use the healing brush to repair crease lines before upscaling. The AI can often blend these repairs seamlessly.
Challenge: Missing Portions
Solution: For small missing areas, the AI can sometimes intelligently fill in the gaps. For larger sections, manual retouching or creative cropping may be necessary.
Challenge: Very Small Original Photos
Solution: Scan at the highest DPI your equipment allows, then use our 4x or 8x upscaling options. Even tiny original photos can produce wall-worthy enlargements.
Beyond Basic Restoration: Creative Projects
Once you've mastered basic photo restoration, consider these creative projects:
Family History Books
Combine restored photos with family stories and genealogical information to create a lasting family history book.
Then and Now Comparisons
Recreate historical family photos with current family members in the same poses, then display the original and new versions side by side.
Photo Walls
Create a gallery wall of restored family photos spanning multiple generations, printed at consistent sizes for visual impact.
Digital Family Archives
Develop a searchable digital archive with restored photos and accompanying information about the people, places, and events depicted.
Conclusion
Restoring old family photographs is more than just a technical process—it's an act of preserving history and connecting generations. While traditional photo restoration required specialized skills and expensive software, AI-powered tools like Image AI Upscale have democratized the process, making it accessible to everyone.
With a good-quality digital copy, some basic editing skills, and our powerful AI upscaling technology, you can breathe new life into fading memories and ensure they remain vibrant for generations to come.
Ready to start restoring your family's photographic treasures? Try our upscaling tool today and see the remarkable transformation for yourself.
For more personalized assistance with challenging restoration projects, contact our team of restoration specialists.